ISIM cluster OS upgrade zero downtime, no reinstall
Zero downtime OS upgrade of an ISIM cluster, without running the product installer
Author(s): Richard Lennert, Tibor Bősze | Created: 16 March 2022 | Last modified: 16 April 2022
Tested on: IBM Security Identity Manager 6.0.22, IBM WebSphere Application Server 8.5
Table of contents
ISIM cluster OS upgrade zero downtime, no reinstall↑
Introduction↑
The client requires upgrading the full stack of a large IBM Security Identity Manager 6.0.22 cluster, that is, OS, middleware and ISIM itself, maintaining all customization and without any downtime. The current stack runs on an unsupported OS version and certain middleware components are also out of support. The official upgrade path involves significant downtime, and consists of many intermediate steps which - as many years have passed since the upgrade path was authored - yield a temporary state that is officially unsupported by now. Heavy customization is compensated by extremely light documentation 😉. There are cases where clearly documented prerequisites and a defensive contract do not bring remedy...
This non-standard process was split into two phases: First upgrade OS and middleware of the ISIM cluster to supported versions with minimal downtime, and subsequently, upgrade ISIM itself, maintaining all the customization that has been made by third parties. This part will take the reader throught the first phase and discuss the migration of the Application Server cluster, leaving the upgrade of DB2 and LDAP out of scope.
In this short guide we will show you how to move an ISIM deployment to new hosts running more recent operating system versions while maintaining existing product version, configuration, middleware components, and also customization such as workflow and script extensions. The objective is to provide a zero downtime migration of a highly customized clustered deployment, avoiding as much as possible any intermediate state which would involve unsupported versions of middleware or other components.
This method is fairly advanced and includes large number of manual steps, but it avoids complications which are present when following the official migration path, such as:
- having to use the ISIM 6.0.0.0 installer, which doesn't support newer operating systems
- having to apply a series of fixpacks, which may override customization and result a non-functioning deployment in the case of a highly customized environment
- having to apply a phased approach with significant downtime and intermediate steps on non-supported operating systems and middleware
In this guide the following prerequisites were assumed:
- These steps were used to move an ISIM 6.0.22 clustered deployment from Windows Server 2008 nodes to Windows Server 2016. The methodology should be similar in other cases, though you mileage may vary. It is not tested to move between Windows and Linux this way, further steps may potentially be needed in that case.
- The middleware components (SDS and DB2) are not in scope of this guide, it is assumed that they remain completely unchanged (same hostname, credentials, SSL certificates, etc.).
- There's a load balancer in front of the WebSphere instances hosting ISIM.
As a guide intended for advanced readers, detailing basic tasks (e.g. installing WebSphere Application Server binaries) is beyond the scope. Only those steps will be explained in detail where it’s critical that they are executed in a particular order or particular way with specific parameters set to certian values.
Note: Before executing any instruction from this guide, make sure that you have backed up your environment, are able to restore those backups and there is sufficient time and experience on your side to recover from a failed migration attempt.
High level migration approach↑
The migration consists of the following activities:
- Prepare a new deployment manager (with the desired OS version) for your WebSphere cluster. Stop and archive the old deployment manager.
- Create a new WebSphere nodes with the desired OS version. Extend your cluster to the new member nodes, apply the required configuration steps, but do not start them yet.
- Do not update load balancer configuration, that is, keep traffic on the old nodes only.
- Copy ISIM files to the new nodes, including all customization.
- Apply ISIM specific adjustments to the new nodes.
- Start new nodes and verify functionality.
- Update load balancer to route traffic to the new nodes.
- Stop and optionally archive old nodes.
Note that during this process, workflow instances will not have to be cancelled or aborted, functionality is not affected, and performance penalties are also negligible if there are sufficient hardware resources to run all new nodes and the old nodes in parallel. If the available hardware does not allow for this scenario, there may be a trade-off in performance depending on the workload, but downtime can still be avoided. In this case, the set of cluster members has to be split and migrated in iterations, which is more time consuming but will allow the required number of members to actively serve workload throughout the process in order to meet SLA. See further details on this topic at the end of this guide.
WebSphere application server↑
This section is applicable to the WebSphere Application Server (WAS) clusters where the ISIM application was deployed.
These steps can handle fixpack level differences between the old and new WAS versions (e.g. 8.5.5.10 -> 8.5.5.20) but they are not suitable for changing major versions (8.5.5 -> 9.0.5).
In this section the following macros are used to refer to common folder paths, profile names and other parameters:
| Name | Description |
|---|---|
| WAS_HOME | WebSphere installation directory, e.g.: C:\IBM\WebSphere\AppServer |
| ISIM_HOME | IBM Security Identity Manager installation directory, e.g.: C:\IBM\isim |
| DMGR_PROFILE_HOME | Deployment Manager Profile directory, e.g.: {WAS_HOME}\profiles\Dmgr01 |
| CUSTOM_PROFILE_HOME | Custom Managed Profile directory, e.g.: {WAS_HOME}\profiles\Custom01 |
| DMGR_PROFILE_NAME | Deployment Manager Profile name, e.g.: Dmgr01 |
| CUSTOM_PROFILE_NAME | Custom Managed Profile name, e.g.: Custom01 |
| WAS_ADMIN_USER | WebSphere administrative user |
| WAS_ADMIN_PASSWORD | WebSphere administrative user’s password |
| CELL_NAME | The name of the WebSphere cell |
Deployment Manager↑
-
Prepare a new dedicated host for the new Deployment Manager with adequate disk space and a supported operating system.
-
Install the latest version of IBM Installation Manager (available from the following link: https://www.ibm.com/support/pages/installation-manager-and-packaging-utility-download-documents).
-
Install a version of WebSphere Application Server that is supported by ISIM on the new Deployment Manager host.
Important! Make sure to install WebSphere Application Server to the same directory where it’s installed on the old node. This path is referenced in several of ISIM’s configuration files, so it must be identical between the old and new nodes.
-
If in step 3. you installed a different WAS version from the existing one stop all WebSphere processes on the old Deployment Manager node, then apply the fix pack to match the version on the new node, and finally restart the Deployment Manager. Log in to the WebSphere Administrative Console and verify that the Deployment Manager is working, the cluster nodes are synchronized and running.
-
Stop the old Deployment Manager and create a full profile backup of its configuration using the following command with the
{output_file}parameter pointing to where the configuration backup .zip archive should be placed (e.g.:C:\temp\configBackup.zip):{DMGR_PROFILE_HOME}\bin\backupConfig.bat {output_file} -nostop -profileName {DMGR_PROFILE_NAME} -username {WAS_ADMIN_USER} -password {WAS_ADMIN_PASSWORD} -
Copy the configuration backup .zip archive to the new Deployment Manager node.
-
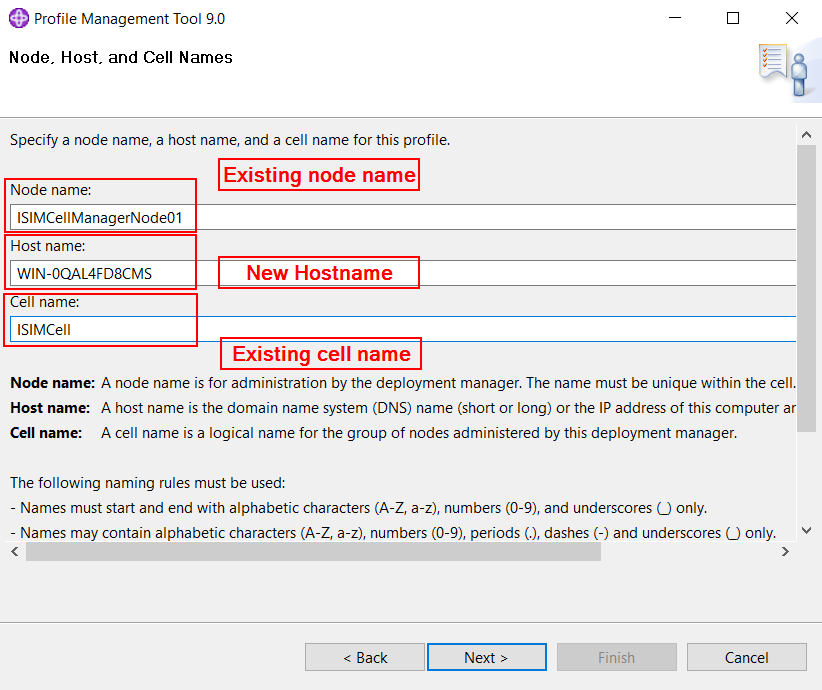
On the new Deployment Manager node create a new Deployment Manager Profile.
Important! Make sure to use the exact same profile name and profile directory as on the old node when creating the profile. Also make sure to provide the same node name for the Deployment Manager as on the old node, and use the name of the existing cell during profile creation, but use the hostname of the new machine.
For example:
Use the same administrative username and password from the old node.
Choose to run the Deployment Manager as a service based on the settings of the old node.
The rest of the settings don’t make a difference, they will be overwritten with the configuration from the old Deployment Manager during the configuration backup restore step.
Once the profile is created do not start the Deployment Manager yet.
-
Restore the configuration backup created in a previous step into the newly created profile with the following command where
{input_file}points to the configuration backup .zip archive:{DMGR_PROFILE_HOME}\bin\restoreConfig.bat {input_file} -nostop -
Locate the
{DMGR_PROFILE_HOME}\config\cells\{cell_name}\nodes\{dmgr_node_name}\serverindex.xmlfile and replace every occurrence of the hostname of the old Deployment Manager node with the hostname of the new one. -
Start the new Deployment Manager and log in to the administrative console. Verify that the managed nodes are synchronized and the servers are running. Optionally make a simple configuration change and check that they are successfully synchronized to the nodes.
-
The new Deployment Manager will present the SSL certificate of the old one (due to the restored configuration backup). Replace this certificate if necessary.
With these steps completed the Deployment Manager was successfully moved to the new node.
ApplicationCluster and MessagingCluster members↑
To add a new member node to the WAS cluster:
-
Prepare a new dedicated host for the new cluster member with adequate disk space and a supported operating system.
-
Install the latest version of IBM Installation Manager (available from the following link: https://www.ibm.com/support/pages/installation-manager-and-packaging-utility-download-documents).
-
Install a version of WebSphere Application Server that is supported by ISIM on the new cluster member host.
Important! Make sure to install WebSphere Application Server to the same directory where it’s installed on the old node. This path is referenced in several of ISIM’s configuration files, so it must be identical between the old and new nodes.
-
Create a custom profile and federate it to the new Deployment Manager.
Important! Make sure to use the same profile name and profile directory as the old nodes.
The profile creation tool will generate self-signed SSL certificates for the node, if this is not acceptable import trusted certificates during profile creation or later using the Administrative Console.
-
Log in to the Administrative Console and verify that the new node is available and synchronized.
-
Add a new member server to the cluster on the new node (don’t start it yet).
-
Only configuration items defined with a cluster scope will be automatically moved to the new node. Any other configurations must be propagated by hand (e.g. JVM memory settings, JVM arguments, modifications to the soap.client.props file, etc.).
Note: At this point the ISIM application is not yet fully installed on this host, to finish configuring it see the next sections.
To remove an old member node from the WAS cluster:
-
Remove the old member node from the Load Balancer configuration.
-
Stop WebSphere Application Server instances on the old member node.
-
Delete the server instances and node from the cell using the Admin Console.
ISIM application↑
In this section the following macros are used to refer to common folder paths, profile names and other parameters:
| Name | Description |
|---|---|
| WAS_HOME | WebSphere installation directory, e.g.: C:\IBM\WebSphere\AppServer |
| ISIM_HOME | IBM Security Identity Manager installation directory, e.g.: C:\IBM\isim |
| DMGR_PROFILE_HOME | Deployment Manager Profile directory, e.g.: {WAS_HOME}\profiles\Dmgr01 |
| CUSTOM_PROFILE_HOME | Custom Managed Profile directory, e.g.: {WAS_HOME}\profiles\Custom01 |
| DMGR_PROFILE_NAME | Deployment Manager Profile name, e.g.: Dmgr01 |
| CUSTOM_PROFILE_NAME | Custom Managed Profile name, e.g.: Custom01 |
| WAS_ADMIN_USER | WebSphere administrative user |
| WAS_ADMIN_PASSWORD | WebSphere administrative user’s password |
| CELL_NAME | The name of the WebSphere cell |
Important! When copying files from the old nodes to the new nodes make sure to copy from Deployment Manager node to Deployment Manager node, from Application cluster member node to Application cluster member node and from Messaging cluster member node to Messaging cluster Member node.
-
Copy any customized files placed in the profile directory from the old node to the new one (
{CUSTOM_PROFILE_HOME}\installedApps\{CELL_NAME}\ITIM.ear\). -
Any prior customizations to the
web.xmlfile must be repeated manually on the new node ({CUSTOM_PROFILE_HOME}\installedApps\{CELL_NAME}\ITIM.ear\itim_console.war\WEB-INF\web.xml). Think about subforms or other customization that may or may not have been appropriately documented. It is strongly recommended to compare the files and scan for undocumented customizations. -
Copy the entire
{ISIM_HOME}directory from the old node to the new one. As the installer has never been run on the new node, but we wish to be able to install fixpacks in the future, some configuration files used by the installer/uninstaller have to be adjusted. The changes below are required for the fixpack installation and process and the uninstaller to work correctly.This list intends to be as complete as possible, so some of the files or some of the entries listed here might be missing in your environment. If the file is missing on the old node ignore it, don’t add it manually on the new node. If the file exists, but the referenced parameter was missing or empty on the old node, then don’t add it / leave it empty on the new node as well.
-
{ISIM_HOME}\bin\DBConfig.laxNODE_NAME: Must be set to the WebSphere node nameSHORT_LOCAL_HOST_NAME: Must be set to the short hostname of the nodeLOCAL_HOST_IP_ADDR: Must be set to the IP address of the node
-
{ISIM_HOME}\bin\DBUpgrade.laxNODE_NAME: Must be set to the WebSphere node nameSHORT_LOCAL_HOST_NAME: Must be set to the short hostname of the nodeLOCAL_HOST_IP_ADDR: Must be set to the IP address of the node
-
{ISIM_HOME}\bin\DeployEba.laxNODE_NAME: Must be set to the WebSphere node nameSHORT_LOCAL_HOST_NAME: Must be set to the short hostname of the nodeLOCAL_HOST_IP_ADDR: Must be set to the IP address of the node
-
{ISIM_HOME}\bin\ldapConfig.laxSHORT_LOCAL_HOST_NAME: Must be set to the short hostname of the nodeLOCAL_HOST_IP_ADDR: Must be set to the IP address of the node
-
{ISIM_HOME}\bin\ldapUpgrade.laxSHORT_LOCAL_HOST_NAME: Must be set to the short hostname of the nodeLOCAL_HOST_IP_ADDR: Must be set to the IP address of the node
-
{ISIM_HOME}\bin\runConfig.laxNODE_NAME: Must be set to the WebSphere node nameSHORT_LOCAL_HOST_NAME: Must be set to the short hostname of the nodeLOCAL_HOST_IP_ADDR: Must be set to the IP address of the node
-
{ISIM_HOME}\bin\SetupEnrole.laxNODE_NAME: Must be set to the WebSphere node nameSHORT_LOCAL_HOST_NAME: Must be set to the short hostname of the nodeLOCAL_HOST_IP_ADDR: Must be set to the IP address of the node
-
{ISIM_HOME}\data\enRole.propertiesenrole.appServer.url: Ensure that this property contains all migrated Application Cluster Members on all migrated nodes, meaning update this value in the currently migrated node and all previously migrated nodes to contain the hostname of the currently migrated node and all previously migrated ones. (e.g.:enrole.appServer.url=corbaloc:iiop:isimhost1:9810,:isimhost2:9810)
-
{ISIM_HOME}\data\IBM Security Identity Manager.URLURL: Must be set to the local ISIM console URL (e.g.:URL=http://isimhost:9080/itim/console)
-
{ISIM_HOME}\itimUninstallerData\installvariables.propertiesNODE_NAME: Must be set to the WebSphere node nameSHORT_LOCAL_HOST_NAME: Must be set to the short hostname of the nodeHTTP_TRANSPORT_HOST: Must be set to the hostname of the nodeITIM_CLUSTER_MEMBER_DATA: Must point to the local cluster member server running on the node. (e.g.:ISIMNode01\:AppClusterMember1;)LOCAL_HOST_NAME: Must be set the long hostname of the nodeLOCAL_HOST_IP_ADDR: Must be set to the IP address of the node
-
{ISIM_HOME}\itimUninstallerData\itiminstaller.propertiesNODE_NAME: Must be set to the WebSphere node nameSHORT_LOCAL_HOST_NAME: Must be set to the short hostname of the nodeLOCAL_HOST_IP_ADDR: Must be set to the IP address of the node
-
-
Copy any referenced shared libraries that were not copied in previous steps to the new node to the same path they were located on the old node.
-
Copy the
{CUSTOM_PROFILE_HOME}\classesdirectory with all its contents from the old node to the new one. -
Create the following WebSphere variables within the new node’s scope:
-
ITIM_HOME- Scope: The new node that was created in the previous steps
- Name:
ITIM_HOME - Value:
{ISIM_HOME}(e.g.:C:/IBM/isim, can be copied from the existing variables of the same name, but different scopes)
-
ITIM_DB_JDBC_DRIVER_PATH- Scope: The new node that was created in the previous steps
- Name:
ITIM_DB_JDBC_DRIVER_PATH - Value:
{ISIM_HOME}/lib/(e.g.:C:/IBM/isim/lib/, can be copied from the existing variables of the same name, but different scopes)
-
-
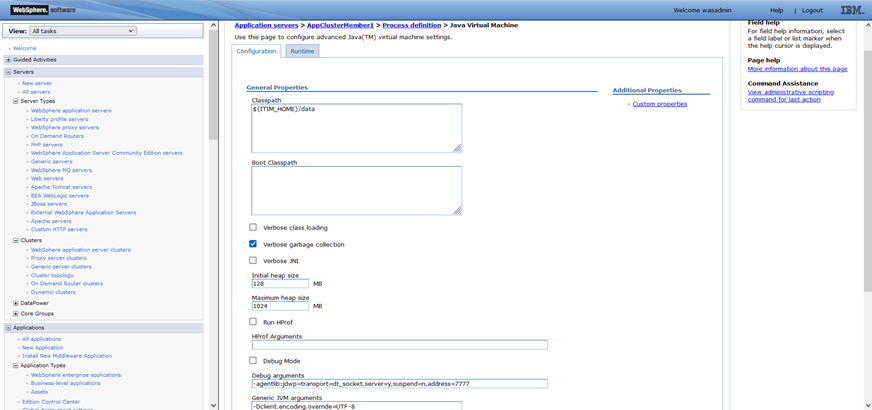
For the newly added cluster member(s) at
Application servers > {server_name} > Process definition > Java Virtual Machineadd${ITIM_HOME}/datato the classpath field, and-Dclient.encoding.override=UTF-8to the generic JVM arguments field. Set initial and maximum heap size to the same values as the old servers.For example:
-
Navigate to
Servers > Core Groups > DefaultCoreGroup > Policiesand click the policy name of the new application server node in the cluster. The format of the name isitim_bus_<nodename>_<appserver name>_policy.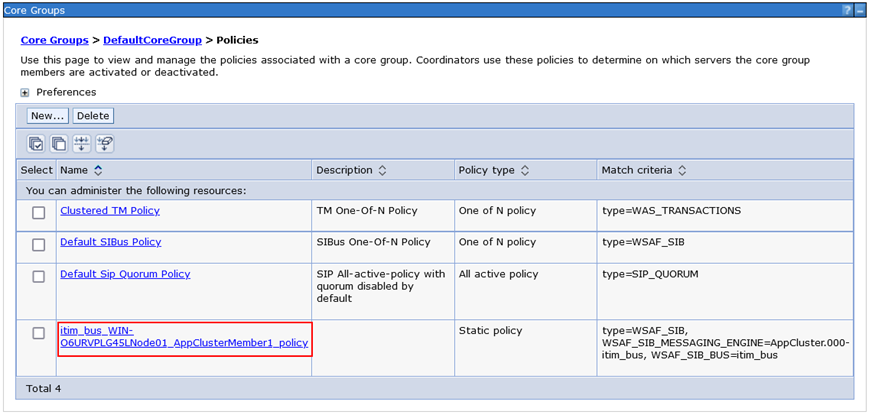
Click
Static group serversand add the new node to the panel on the right side labeledStatic group servers.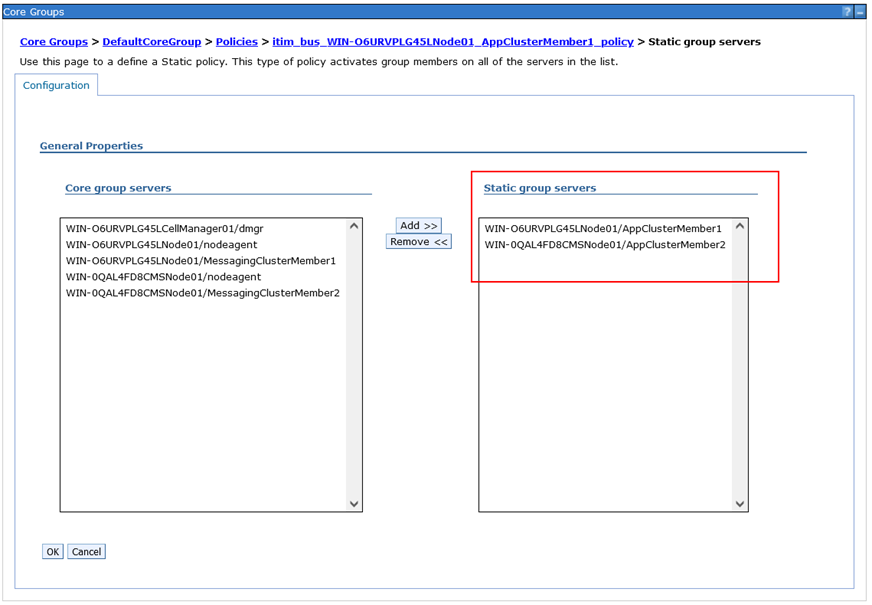
-
Start the server(s) on the new node, and ensure that the ITIM application was started. Navigate to
Buses > itim_bus > Messaging engines, and make sure that both engines started successfully. -
Verify ISIM functionality on the new node.
To remove an ISIM node from the cluster:
-
Remove the WebSphere node from the cluster as described in the previous section.
-
Remove the node’s hostname from the
enrole.appServer.urlproperty in the{ISIM_HOME}\data\enRole.propertiesfile on all other nodes.
Downtime↑
The ISIM migration approach detailed in previous sections itself requires no downtime from the perspective of ISIM, however this does not cover the potentially necessary downtimes when migrating middleware components that ISIM relies upon, such as ISDS and DB2.
By migrating the nodes one-by-one or in small batches it’s possible to schedule the migration in a way that keeps a sufficient number of nodes online throughout the process (the sufficient number of nodes depends on the expected workload during the migration).
When migrating the deployment manager from one node to the other a relatively short time window is required when the Deployment Manager is unavailable. This does not affect ISIM, it can continue serving requests uninterrupted, but making WebSphere configuration changes is not possible in this window. This should not have any noticeable impact on end users.
Rollback considerations↑
In the approach detailed in the previous sections only the steps taken to remove nodes from clusters actually affect old nodes, every other step leaves them unchanged. To provide a way for rolling back in case of serious errors it is recommended to keep the old nodes intact and a part of their cluster and cell. They can be taken offline and shut down but should not be deleted from disk. In this case rolling back would simply mean powering up the old nodes and server and shutting down the new ones.